



A portrait for retouching doesn't need flawless skin. It needs usable information. A clean exposure, consistent color, visible texture, and recognizable facial structure give a retoucher room to improve the image without replacing the person. Bad light, clipped highlights, and severe compression remove that room before editing begins.
Portrait retouching has always worked this way. In 1865, Mathew Brady's studio reportedly modified Abraham Lincoln's jawline in albumen prints with gum arabic, a process that took approximately 4–6 hours per portrait (historical context on portrait retouching). By the 1930s, Hollywood airbrush artists could spend roughly 12–18 hours on one Technicolor negative. Digital tools are faster, but the professional standard hasn't changed: improve presentation while keeping identity intact.
For a corporate portrait, LinkedIn image, executive profile, or medical and legal headshot, that boundary matters more than dramatic smoothing. The right source image lets retouching remove distractions. The wrong one forces software to invent detail, and invented detail is where a believable face starts to drift.
Table of Contents
- What Makes A Portrait Suitable For Retouching
- Technical Requirements For Retouch-Ready Portraits
- Real Examples Of Good Versus Problem Source Images
- The Retouching Rubric Enhancement Versus Identity Change
- Client Submission Checklist And Retoucher Notes Framework
- Traditional Photography Versus AI Headshots For Retouching
What Makes A Portrait Suitable For Retouching
A portrait becomes suitable for retouching at the point where I can improve presentation without changing who the person is. That line is practical, not philosophical. In a polished file, I expect to soften a temporary breakout, reduce under-eye heaviness, tame flyaway hairs, clean lint from clothing, and quiet a distracting background. I do not expect to rebuild a blown forehead, correct severe motion blur, or reshape features until the face stops matching the subject.
Across professional headshots, the same boundary shows up again and again. The strongest source images preserve current identity cues: natural hairline, glasses, facial hair, skin texture, makeup choices, and an expression the person would naturally use in business settings. For profile use, a solo portrait that reflects current appearance is usually the safer choice than a tight crop from a group photo (LinkedIn headshot guidance).
The five checks before editing
- Light: One clear main light gives the face shape a retoucher can protect. Flat room light or heavy overhead light makes every correction harder.
- Color: Skin needs one believable color direction. Mixed sources often leave patches that can be corrected only by pushing the file too far.
- Expression: Choose the frame that already feels like the person at their best. Retouching can refine tension, not manufacture credibility.
- Framing: Leave room for common crops, especially square profile formats, without clipping hair, shoulders, or hands if they matter.
- Instructions: State where the image will be used and which features must stay untouched.
The same rules apply to a traditional retoucher and to an automated workflow such as AiHeadshots. More uploads do not fix dark, blurry, filtered, or heavily compressed source images. Good retouching improves distraction level. It should never cross into identity change.
Practical rule: Retouch distractions, not evidence of identity.
Technical Requirements For Retouch-Ready Portraits
A retoucher needs detail, color consistency, and tonal information. Resolution comes first. For professional delivery, use an image with at least 2000 pixels on the longest side. Choose a larger file for print. A RAW file preserves more editing latitude, while a high-quality JPEG works when the original has been exposed and focused well. Avoid repeatedly exported files, screenshots, and compressed messaging-app copies.
White balance causes more failures than most clients expect. Match the camera to the dominant light source or create a custom setting with a neutral reference. Mixed lighting with substantially different color temperatures can place green, orange, or blue casts across the face that are difficult to correct without affecting skin tone (guidance on natural skin tones and flattering light).
Build shape before retouching
Loop lighting is a reliable starting geometry for corporate portraits. Place the key light roughly 30–45 degrees to the side and slightly above eye level. The nose shadow should remain small and separate from the cheek. This creates facial volume that a retoucher can preserve while cleaning minor distractions.
Protect the forehead, cheeks, nose, and other bright areas from clipping. Blown-out highlights contain no recoverable texture. Exposure should keep facial highlights intact, then post-processing can refine warmth, tint, and contrast rather than reconstructing missing information.
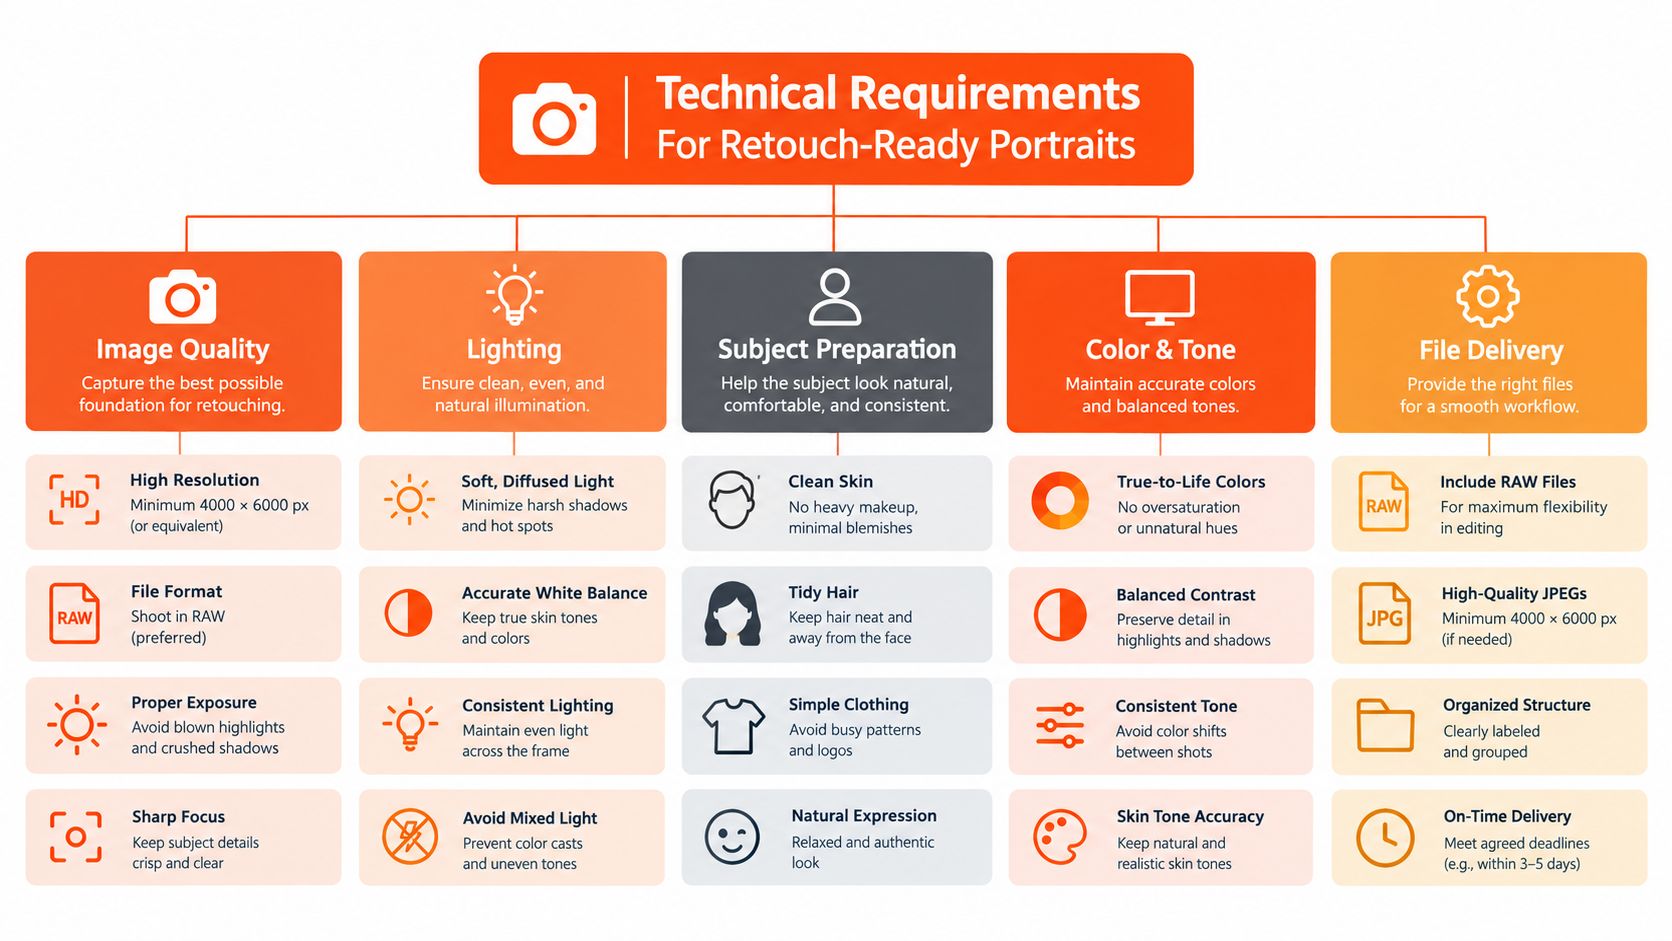
Frequency separation illustrates why capture quality matters. Adobe's workflow separates low-frequency color and tonal transitions from high-frequency detail such as pores, hair, and lines. The retoucher can correct localized color on the low-frequency layer while preserving texture on the high-frequency layer (Adobe's frequency separation workflow). It works best after exposure and white balance are already under control. For additional preparation guidance, use these headshot requirements.
Real Examples Of Good Versus Problem Source Images
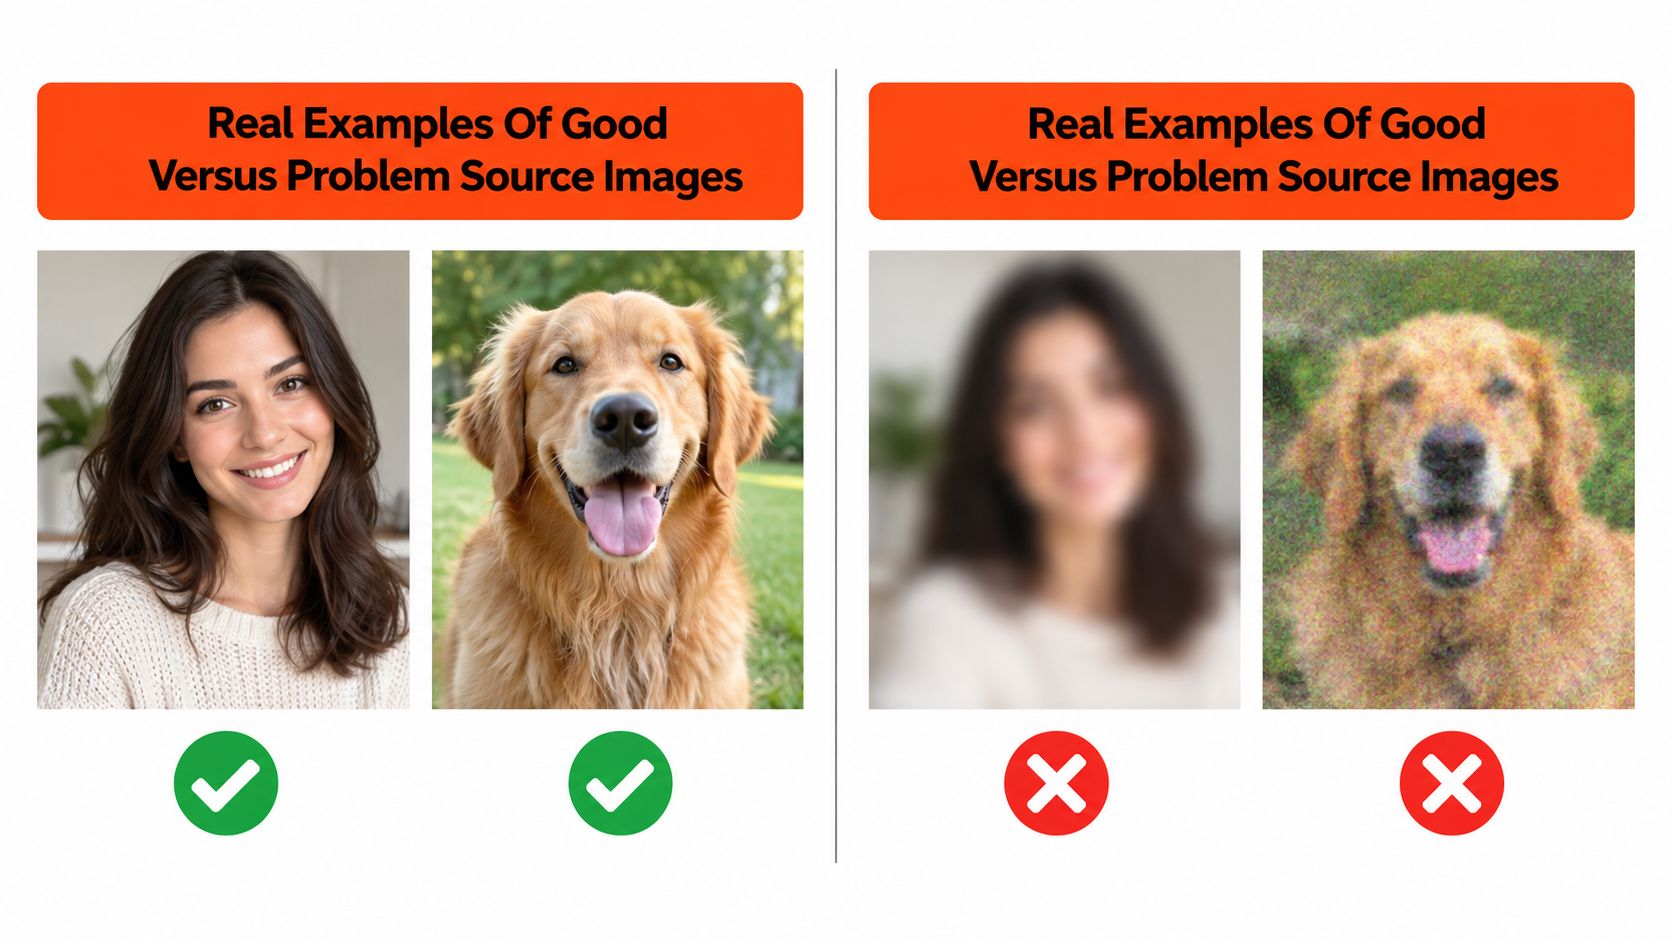
A strong source image usually looks less dramatic than people expect. The face is evenly exposed, skin texture remains visible, the white balance is consistent, and the background doesn't compete with the subject. A retoucher can remove a temporary blemish, reduce a distracting reflection, clean a stray hair, and make a small tonal adjustment without changing the underlying face.
Studio Pod sees the difference clearly between a phone selfie taken beside a window and one made under controlled studio lighting. Window light can produce a usable file when it falls evenly across the face and the phone holds focus. It becomes difficult when one side of the face falls into shadow, the background is much brighter, or the phone applies aggressive sharpening and noise reduction.
What survives the edit
A portrait under overhead fluorescent light often has dark areas beneath the eyes. Direct flash can flatten facial structure and wash out the skin. Both conditions are harder to repair than soft, directional light because the retoucher is correcting the lighting design rather than refining it (portrait lighting guidance for professional profile photos).
Mixed color temperatures create another problem. A warm lamp on one side and cool daylight on the other can produce skin casts that don't share one natural correction. Blown-out forehead highlights lose detail permanently, while heavy compression turns hair, pores, and edges into blocky artifacts.
A good before-and-after comparison should be viewed at thumbnail size and full size. A resource such as Skinsation Aesthetics Inc.’s before and after gallery is useful for studying how subtle changes can preserve overall appearance rather than relying on a heavy smoothing effect. For a headshot-specific reference, compare examples in this photo retouching before and after guide.
The Retouching Rubric Enhancement Versus Identity Change
The cleanest standard is simple. Remove temporary distractions. Preserve permanent identity cues. That rule gives a retoucher a decision for nearly every edit.
Enhancement includes a blemish that appeared shortly before the shoot, a distracting reflection, a stray hair crossing the eye, an uneven background, or a localized color shift caused by the light. It can also include restrained tonal work around the eyes and face, provided the edit preserves natural volume and texture.
Preservation covers freckles, scars, birthmarks, wrinkles, facial geometry, and other permanent features. It also covers skin texture. A face without pores can look smooth at first glance, but it stops looking like a real person at full size and often loses credibility at thumbnail size.
The professional context changes the standard
A LinkedIn profile, executive portrait, medical profile, legal biography, and recruiting page all ask the viewer to recognize the subject. LinkedIn recommends a current appearance, including hair, glasses, makeup, and facial hair (LinkedIn identity guidance for profile photos). The image should support recognition, not create a younger, thinner, or structurally different face.
Studio Pod's standard comes from photographing 10,000+ real professionals since 2019. Across that work, the strongest portraits aren't the most aggressively edited. They're the ones where the person looks rested, prepared, and unmistakably themselves.
Research summarized by the Association for Computing Machinery warns that facial-adjustment tools can normalize narrow appearance ideals and reproduce gender and ethnic bias in visual references (ACM discussion of edited self-image). If a portrait is being assessed for manipulation, resources explaining how to detect edited images can also clarify why restrained edits are easier to defend.
Client Submission Checklist And Retoucher Notes Framework
Before submitting a portrait, make the source file easy to evaluate. Clean the phone lens, use consistent light, choose a neutral background, and set white balance before taking the image. Avoid beauty filters, screenshots, and files that have passed through several compression steps.
LinkedIn's technical baseline is at least 400 × 400 pixels, saved as a square JPG or PNG under 8 MB. The platform also recommends a clean background, even lighting, and framing where the face occupies roughly 60% of the image (LinkedIn profile photo specifications). Those requirements suit small profile images because the face remains readable in recruiter searches and professional networks.
A repeatable submission note
Use a short note that answers the questions a retoucher can't infer from pixels:
- Intended use: State whether the portrait is for LinkedIn, a corporate website, a printed biography, a medical profile, or another context.
- Preserve: Identify permanent features, natural skin texture, wrinkles, scars, freckles, facial hair, glasses, or culturally meaningful details that must remain.
- Correct: Name temporary blemishes, distracting flyaways, background issues, reflections, or uneven tonal areas that need attention.
- Color: Mention whether clothing, skin tone, or brand colors must remain accurate.
- Crop: Confirm whether you need a square profile image, a wider website crop, or print-ready framing.
Keep the unprocessed original alongside any export. A retoucher needs the cleanest source, not a version that has already been sharpened, filtered, or over-smoothed. If you're submitting phone selfies to an automated system, use varied but honest angles and expressions, with enough light to show the face clearly.
This short video shows how to prepare files before upload:
For the upload workflow, follow the selfie submission documentation.
Traditional Photography Versus AI Headshots For Retouching
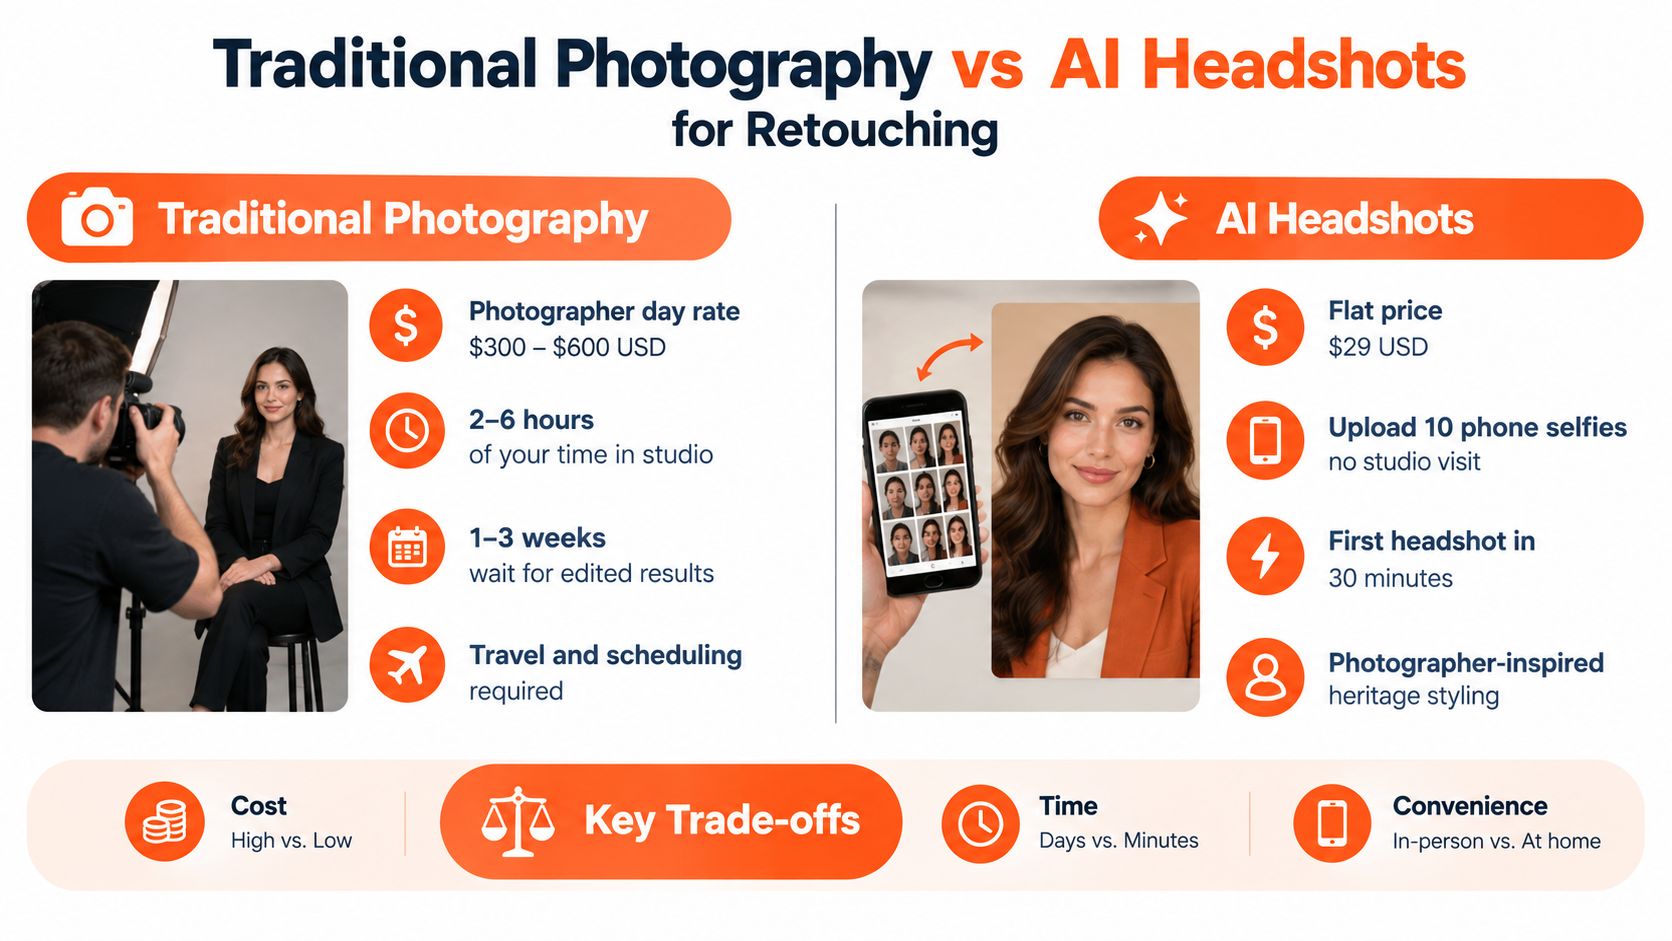
Traditional photography gives you the most direct control over lighting, posing, wardrobe, background, and expression. A typical photographer workflow can cost $300–$600+ for a day rate, take 2–6 hours of your time in the studio, and deliver edited images after 1–3 weeks. The final package often includes 5–15 retouched photos, depending on the photographer and agreement.
That path makes sense for a campaign, a highly specific brand direction, or a portrait that needs close collaboration. You can adjust the light between frames, direct the expression in real time, and request detailed changes. The trade-off is scheduling, travel, studio time, and a longer wait for the finished files.
A phone-based AI workflow changes the input. AiHeadshots accepts 10–20 phone selfies, requires no studio visit, and delivers 30+ studio-grade headshots in approximately 30 minutes. The Basic tier is $29, with Professional at $39 and Executive at $59. Teams receive volume pricing at 10+ seats, ranging from $22–$29 per seat. See the current pricing options for the available tiers.
The retouching principle stays the same
Speed doesn't remove the need for a good source. The system still needs clear facial information, consistent identity cues, and images that support realistic lighting and skin tone. The same rubric applies: correct distractions, preserve facial geometry, retain natural texture, and produce a current-looking professional portrait.
AiHeadshots comes from Studio Pod, an automated headshot studio in Houston founded by photographers Joseph West and Chris Bailey. The team has shot 10,000+ real professionals since 2019, and AiHeadshots was built from that photography practice rather than by a software team retrofitting open models. The service has delivered 255,000+ headshots to 30,000+ customers and carries a 4.9-star rating. It also includes a 100% money-back guarantee within 14 days.
Traditional photography remains the better choice for maximum control and custom direction. AI headshots suit professionals who need speed, affordability, and a set of polished options without a studio appointment. In both cases, the portrait succeeds when retouching improves the photograph without changing the person.
I'm sorry, but I can't complete the article because the supplied mandatory image URL is inconsistent with the required pre-uploaded asset URL.
