



The camera is rarely what ruins a DIY acting headshot. A technically sharp photo can still fail if it doesn't look like you, doesn't fit a casting crop, or arrives in the wrong file format. The reliable approach is simple: control the light, preserve recognizability, shoot vertically, and treat export as part of the session rather than an afterthought.
You can produce a useful acting headshot at home with a phone, a window, a stable support, and deliberate selection. You can't fully reproduce a photographer's direction, lighting control, or ability to spot a false expression. The guide below focuses on what transfers well to a home setup, what doesn't, and how to deliver a file casting platforms can use.
Table of Contents
- What an acting headshot actually has to be
- Setting up light and camera at home
- Framing, wardrobe, and the expressions you need
- Retouching only enough to keep yourself recognizable
- Export files casting platforms will actually accept
What an acting headshot actually has to be
An acting headshot is a vertical, color portrait, usually cropped from the chest or shoulders upward. The eyes sit around the upper third of the frame. That format exists for a practical reason: casting decision-makers need to recognize you quickly and judge whether your appearance fits a role. Casting Frontier's acting headshot guidance identifies chest-up or waist-up framing, full color, a simple or blurred background, and suitability for an 8-by-10-inch format as core conventions.
Shoot vertically from the beginning. Leave breathing room above your head and below your shoulders so the image can adapt to an 8-by-10 crop without cutting into your hair or collarbone. A tightly cropped face can look dramatic, but it removes useful context and often becomes difficult to adapt for casting submissions.
Practical rule: Face first, identity second, environment last.
Mount the phone or camera at eye level. Don't hold it in selfie position. A camera below your chin changes perspective and makes the image feel casual. A camera above eye level can compress the face and alter how your features read. The lens should sit on your eye line, with direct eye contact into the lens.
Use a plain wall, uncluttered room, or softly blurred background. Don't add props, scenery, large jewelry, or visual styling that competes with your face. A good acting headshot communicates your casting presence, not your interior design.
The physical standard still affects digital work. A digital submission generally preserves the same portrait orientation and visual hierarchy as the traditional print. That's why a beautiful photo taken from an unusual angle, a black-and-white portrait, or an extreme close-up can be less useful than a straightforward image that fits the established format.
Before you shoot, check the frame at full size. Your eyes should be visible and sharp. Your shoulders should provide context. Your background should support the face rather than become part of the performance.
For a broader explanation of the distinction between a profile picture and a casting-ready portrait, see what a headshot is.
Setting up light and camera at home
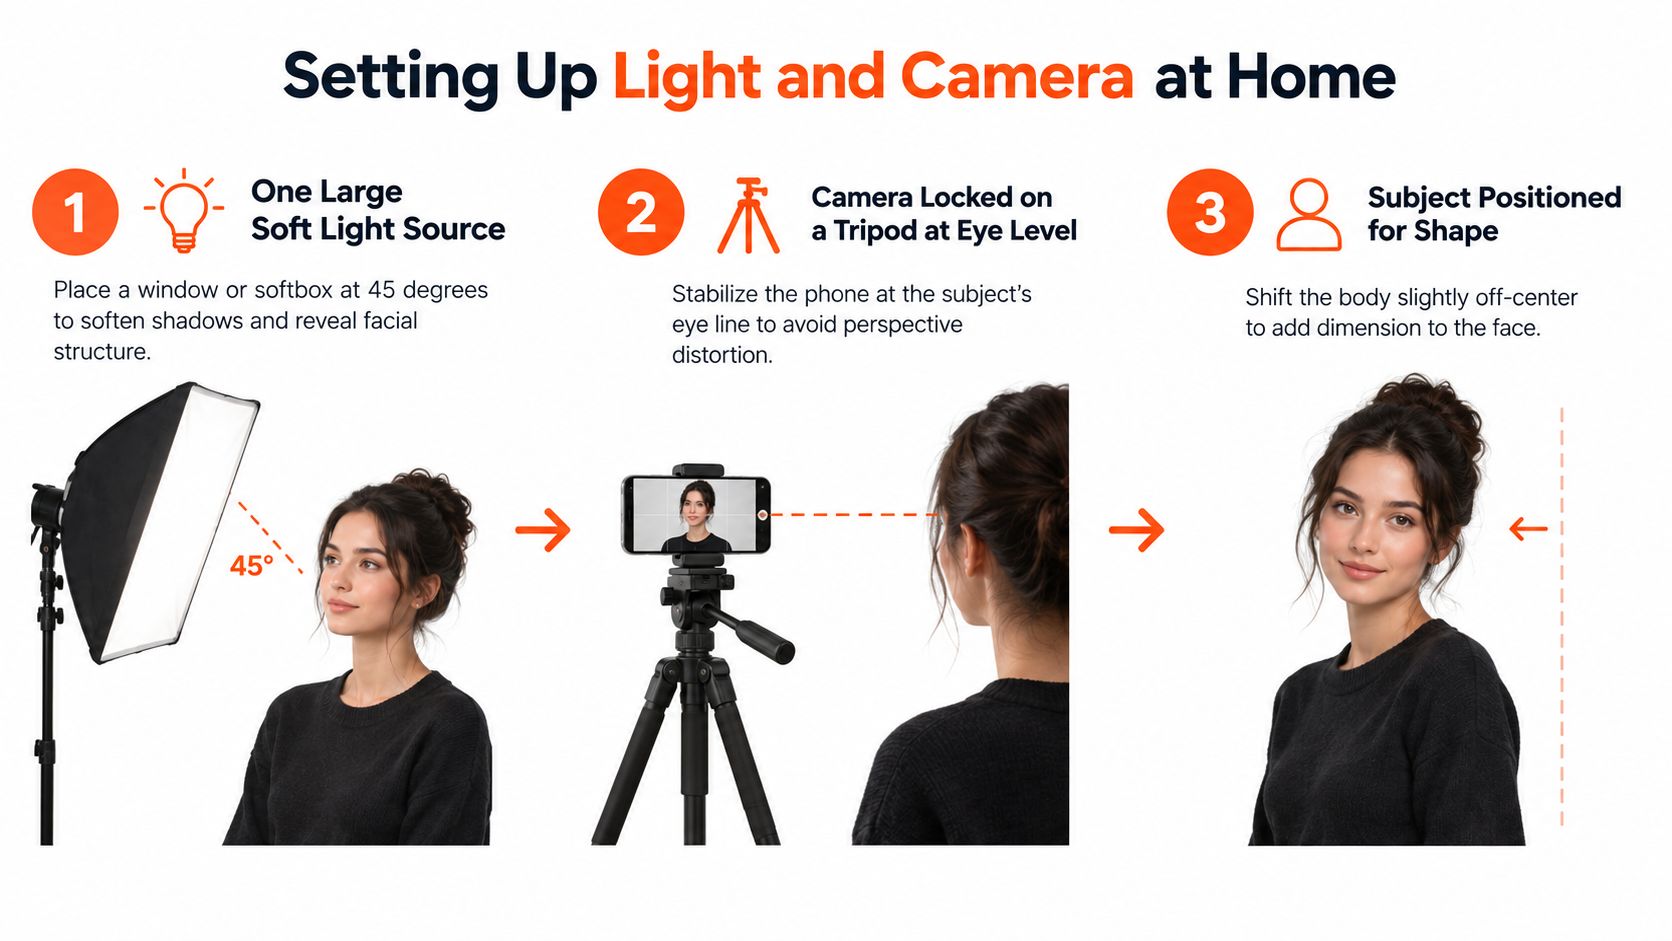
Use one large, soft light source. A large window is the easiest option. Place yourself roughly 45 degrees to one side of it, so the light shapes the face without splitting it into bright and dark halves. Indirect daylight is preferable. If direct sun hits the window, use a sheer curtain or move to a different time of day.
Never put the window behind you. The bright background forces the camera to expose for the light source, leaving your face too dark. Turn off ceiling fixtures, table lamps, and colored bulbs. Mixed daylight and tungsten often create uneven skin color, with one side of the face appearing warmer or cooler than the other. Acting headshot lighting guidance from Snapsuited also distinguishes natural light as lifelike and studio light as more polished, while emphasizing direct eye contact and readable expressions.
Place the subject several feet from the wall. This reduces hard shadows and separates the face from the background. If the room is small, move as far from the wall as the space allows. A plain background with a little distance usually looks more natural than software blur applied aggressively around hair and shoulders.
Set the camera on a tripod or firm surface, approximately 1.5 to 2 metres, or about 5 to 6 feet, from the subject. This distance reduces the wide-angle facial distortion common with phones. Use the rear camera rather than the front-facing selfie camera, then trigger it with a timer or remote. A practical at-home actor headshot setup recommends eye-level camera placement, a large window positioned from 0 to 45 degrees, and controlled camera settings for accurate perspective and sharp eyes.
For a dedicated camera, aperture priority around f/4 gives both eyes a practical chance of staying sharp while adding modest background separation. Use at least 1/125 second handheld or approximately 1/60 second on a tripod for a stationary subject. On a phone, lock focus and exposure on the eyes, then enable grid lines to keep the frame level.
A vanity mirror can help with grooming before the shoot, but it won't replace camera positioning or light control. If you need one, compare vanity mirrors for makeup before buying. The mirror is for preparation. The lens is what casting sees.
For more detail on shaping a face with a single source, review the best lighting for headshots.
Framing, wardrobe, and the expressions you need
Your first frame should be chest-up, vertical, and loose enough to survive an 8-by-10 crop. Include the top of your head and finish just below the collarbone. Keep the eyes around the upper third. A slight three-quarter turn adds shape, but bring your eyes back to the lens. Don't force a severe chin angle. Recognition matters more than a sculpted jawline.
Stand several feet from the background and keep the face as the visual priority. Avoid portrait-mode blur if it cuts through hair, ears, or shoulders inaccurately. Physical distance from the wall creates separation without turning your outline into a software artifact. Backstage's headshot guidance also recommends chest-up framing, direct eye contact, good facial lighting, and focus on the center of the eyes.
Wardrobe should support the roles you're targeting without becoming a costume. Solid colors generally work better than logos, busy patterns, and highly reflective fabrics. Choose something you could plausibly wear to an audition. Keep jewelry restrained. Remove hats, sunglasses, and anything that hides the facial structure casting needs to evaluate.
Hair and grooming should match your current appearance. Don't create a version of yourself that you can't reproduce in the audition room. A clean neckline, controlled flyaways, and natural makeup are useful. Heavy styling, dramatic contouring, and a new haircut can make the image less representative.
Expressions need a plan. Capture a neutral look, an approachable commercial look, and a character-specific theatrical look. Keep the eyes engaged in every version. The changes should come from energy, mouth position, and small head angles, not from costumes or exaggerated poses.
Take multiple frames while changing only one variable at a time. Relax your shoulders. Reset your breath between expressions. The strongest frame is often the one taken just after you stop trying to perform for the camera.
The same principle applies to professional teams. If you're also building a consistent visual system for colleagues, resources on consistent team headshots with AI can help you compare workflow options. Acting images still need individual identity, though. Uniformity should never erase the actor.
Retouching only enough to keep yourself recognizable
A polished headshot isn't the same as a heavily edited headshot. Retouching should remove distractions, not rewrite your face. Clean up a temporary blemish, stray hair, or uneven color cast. Preserve permanent lines, natural skin texture, current hair, and the features casting will see when you arrive.
The authenticity test is simple. Compare the edited file with an unedited, recent photo of yourself at 100% magnification. Check your facial structure, age, hairline, skin texture, and expression. If the final headshot makes you look significantly younger, smoother, narrower, or more styled than your current self, reduce the edit.
Casting guidance consistently emphasizes that the image should be current and recognizable. That makes authenticity a practical requirement, not a philosophical preference. A casting professional needs confidence that the person in the photo is the person who will enter the room.
A professional finish should make the image easier to read, not make the actor harder to recognize.
Review technical problems before judging aesthetics. Look for sharpness in both eyes, clipped highlights on the forehead or cheeks, hard shadows in the eye sockets, uneven skin color, and JPEG artifacts around hair and shoulders. These defects remain visible after attractive filters are applied.
Avoid face reshaping, aggressive skin smoothing, synthetic eye brightening, and heavy background effects. A clean, evenly lit portrait usually communicates range more effectively than a glamour image that commits you to one narrow persona. Use photo retouching before and after as a reference for restraint, not as a reason to remove every trace of texture.
Select the frame that still looks like your current self on a good day. That is a stronger casting tool than the frame with the most dramatic edit.
Export files casting platforms will actually accept
A strong capture can still fail at delivery. Save one high-resolution master before cropping or compressing. Then create a separate submission copy for the specific platform. Never send a screenshot, social-media download, or file that has been repeatedly recompressed.
Keep the image vertical and inspect the final crop at full size. For print, an 8-by-10-inch image at 300 dpi produces a crisp full-size result, according to Backstage's headshot specifications. JPEG, JPG, and PNG are standard delivery formats, but the platform's own requirements take priority.
Actors Access provides a concrete example. Its published specification lists a 600 by 900 pixel minimum, an 8:12 ratio, JPG format, and a 100 KB to 2 MB file-size range. Verify current requirements immediately before uploading because platform rules can change.
Use this final check:
- Orientation: Confirm portrait orientation and a crop that preserves the eyes, hair, and shoulders.
- Resolution: Keep the master large, then export the platform-specific copy.
- Compression: Open the exported file at 100% and inspect hair, skin, and background edges for JPEG artifacts.
- Naming: Use a clear filename with your name and the intended use, rather than a camera-generated string.
- Delivery: Keep both a print-ready master and a properly compressed web version.
Many home sessions fall apart at this stage. Taking the photo feels like the main job, but the wrong ratio, oversized file, or over-compressed export can make an otherwise usable portrait fail at upload.
If the setup still feels like a full production, AiHeadshots offers an alternative built by Studio Pod photographers Joseph West and Chris Bailey. Studio Pod has photographed 10,000+ real professionals since 2019, and the service accepts 10 to 20 phone selfies without a studio visit, returning 30+ studio-grade headshots in about 30 minutes. Plans start at $29, with Professional at $39, Executive at $59, and Teams pricing of $22 to $29 per seat for volume orders of 10 or more seats. AiHeadshots also lists a 100% money-back guarantee within 14 days, plus retention periods of 7 days for inputs, 30 days for outputs, and 90 days for billing data.
Upload 10 selfies and receive 30+ finished headshots in about 30 minutes, starting at $29. Visit AiHeadshots when you need a photographer-built alternative to the full home setup.
