



People form impressions from faces in about a tenth of a second, and judgments about trustworthiness and competence arrive almost immediately. The psychology behind headshot eye contact explains why posing isn't decoration. Your gaze, chin, head angle, and shoulders communicate before anyone reads your job title.
The reliable approach is small and physical. Rotate the torso, settle the shoulders, bring the chin forward and slightly down, then aim the eyes with intention. After posing more than 10,000 real professionals since 2019, Studio Pod photographers Joseph West and Chris Bailey built AiHeadshots around those details, not generic smile-at-camera advice.
Table of Contents
- Why your headshot pose decides trust in seconds
- The foundation that makes every headshot work
- Head tilt chin position and where to look
- Posing variations for different industries and roles
- Wardrobe hands and camera setup that support your pose
- Fixing common headshot posing mistakes quickly
Why your headshot pose decides trust in seconds
A strong headshot has one job: communicate a credible, open version of you inside a very short first-impression window. A rigid pose can make confidence look like severity. A collapsed posture can make warmth look uncertain. The camera records the difference, even when the adjustments feel almost invisible in the room.
Clear eye contact helps viewers feel addressed. A slightly open facial angle keeps the image from looking confrontational. Relaxed shoulders prevent the portrait from carrying visible tension. These choices work together because viewers don't evaluate them separately. They read the whole face and upper body as one social signal.

The shift from formal to intentional
Traditional studio portraits often relied on a centered body, fixed posture, and formal expression. Modern headshot posing is more deliberate. Photographers use tiny changes in gaze direction, body rotation, and expression to make a portrait feel present rather than frozen.
A recent empirical study found that perceived direct eye contact was strongest not necessarily when the subject looked exactly at the lens, but when the eyes aimed about two degrees below it, near the bridge of the nose. The study on perceived eye contact gives practical support to a cue many photographers discover through repetition: looking directly at the glass can create a hard stare, while aiming just below it often feels more natural.
Practical rule: Pose for the first glance, not for a long inspection.
For financial professionals, the same principle applies across a website, profile page, and team directory. The Advisor Momentum branding guide is a useful resource for thinking about how a professional image fits a broader trust-building identity.
The pose is learnable. You don't need natural camera presence. You need a repeatable setup that gives your eyes, face, and shoulders clear instructions.
The foundation that makes every headshot work
Start below the neck. The body creates the frame for the face, and a flat body position makes even a well-directed expression look static.
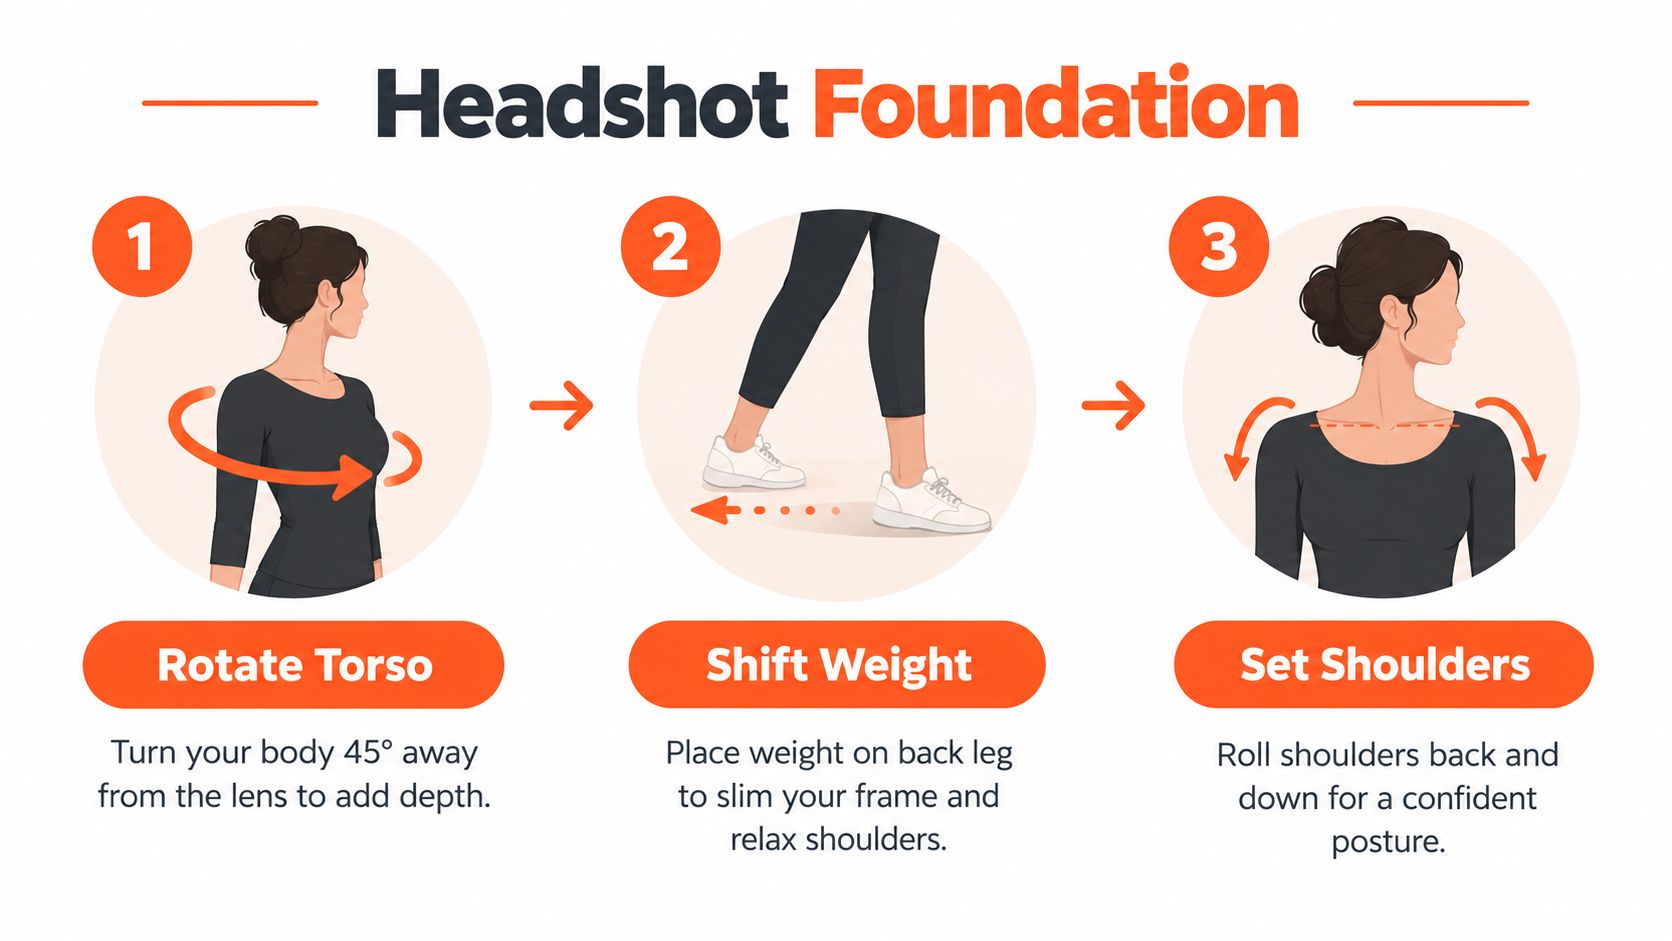
Turn your torso about 30 to 45 degrees away from the camera, then bring your face back toward the lens. Capturely's headshot posing guidance uses this rotation to create depth and avoid the mugshot effect. Your shoulders no longer form a broad, unbroken line. One shoulder sits farther from the lens, which gives the portrait shape.
Build the stance in order
Place your weight on the back foot. This keeps the front side from pushing toward the camera and helps the upper body settle instead of brace. You should feel grounded, not tilted.
Next, drop the shoulder closest to the camera slightly. Roll both shoulders back and down. Raised or level shoulders often read as tension, while a lower near shoulder creates a calmer line. Snappr's headshot pose guide also recommends rolling the shoulders back and down rather than holding them rigidly square.
Your chest stays open, but don't force it forward. Overcorrecting creates a military stance and tightens the neck. Let the torso rotation provide the structure.
- Rotate the torso: Turn away from the lens until the shoulders create visible depth.
- Shift the weight: Settle into the back leg so the body relaxes without slumping.
- Set the shoulders: Lower the near shoulder, then roll both shoulders back and down.
The sequence matters. If you adjust the face first, you'll often compensate with your shoulders. If you set the body first, the head can return naturally toward the camera.
The common corporate formula adds a slight lean toward the lens. Capturely's corporate headshot instructions pair that lean with body rotation, a forward-and-down chin, dropped shoulders, and direct eye contact. Keep the lean subtle. You should look engaged, not as if you're trying to enter the frame.
Use this setup for a phone test before a session. Stand naturally, rotate the torso, shift the weight, and take one frame after each adjustment. The final image should show an open neck, relaxed shoulders, and a face that leads the portrait.
Head tilt chin position and where to look
Once the body is set, make the face do less, not more. Most unflattering headshots come from excessive correction. The goal is a series of small movements that sharpen the image without announcing themselves.
Push the chin slightly forward, then lower it a little. This lengthens the front of the neck and defines the jawline. It feels counterintuitive because people usually pull the head backward when they feel watched, but that move compresses the area beneath the chin.
Don't jam the chin down. That creates folds and a heavy downward gaze. Think forward first, then slightly down. Capturely's posing formula describes the same forward-and-down position as part of a standard professional stance.
Keep the head open
Turn the head back toward the camera after rotating the torso. A slight turn is enough. Too much body rotation paired with a fully returned face can disconnect the head from the shoulders and make the pose feel artificial.
A small head tilt changes the emotional register. A level head feels direct and authoritative. A subtle tilt feels more approachable. For a senior executive or attorney, keep the tilt restrained. For a consultant, recruiter, or client-facing adviser, a small tilt can soften an otherwise formal frame.
Aim the eyes just below the lens, close to the bridge of the nose. The measured two-degree adjustment identified in research on perceived eye contact creates directness without the locked-on quality of staring at the center of the lens.

Expression follows gaze. Relax the eyelids, keep the brow quiet, and let the mouth settle into the expression your role requires. A genuine smile needs movement around the eyes. A reserved expression still needs life in the eyes, or it becomes blank. For more practical expression work, see how to create happy facial expressions.
Use a phone camera to test three versions: level head, slight tilt, and slight turn. Keep the torso position unchanged. Compare the images at the same crop. The best version usually isn't the most dramatic one. It's the one where the eyes, jaw, and neck look connected.
Posing variations for different industries and roles
The same foundation can support very different professional signals. Keep the torso angled and the shoulders relaxed, then change the intensity of the face, the lean, and the amount of visible body.
A corporate director often needs a firm chin, direct gaze, and restrained smile. The pose should feel prepared and dependable on a company page. A lawyer can use a slight head tilt and a warmer mouth position without losing authority. The difference is narrow, but viewers feel it.

Match the pose to the relationship
A physician or therapist benefits from an open shoulder line and a relaxed expression. Patients need competence without emotional distance. Keep the gaze steady and let the face soften rather than pushing a broad smile.
A real estate professional can lean slightly toward the camera and use a clear, welcoming smile. The body language should suggest readiness to speak with someone, not a formal identification photograph. A visible hand can work in a wider portrait, but keep the crop clean and avoid crossed arms that make the subject look closed off.
Creative professionals have more room for asymmetry. A relaxed smile, a less formal shoulder position, or a casual hand placement can reflect a personal brand. The pose still needs a clear face and controlled eyes. Casual doesn't mean careless.
Executives often benefit from the strongest structure: rotated torso, lowered near shoulder, controlled chin, and direct gaze. Reduce the smile rather than removing expression. A leadership portrait should feel composed, not severe.
For a more formal treatment, posing for corporate headshots provides a useful reference. The practical decision is simple: ask what the viewer should feel first, then tune the pose toward that response.
Wardrobe hands and camera setup that support your pose
Wardrobe either frames the face or competes with it. Choose a neckline that leaves the neck visually clear. Open collars and V-necks create space beneath the jaw, while a high, heavy neckline can make the head look disconnected from the body.
Solid colors usually keep attention on the face. Fine patterns can create visual noise, especially in a small profile crop. Clothing that fits well supports the shoulder line you built through posing. Oversized fabric hides that structure, while overly tight clothing creates its own distraction. The guide to what to wear for a LinkedIn headshot offers practical outfit planning.
Hands need a decision. In a traditional headshot, crop above the arms and remove the issue entirely. In a wider portrait, let one hand rest naturally or hold a relevant object only if it supports the role. Crossed arms often read as defensive, and they can widen the visual block across the torso.
Camera height changes the chin. A camera set too low encourages an upward angle and emphasizes the underside of the jaw. A camera set too high makes the subject look down and can flatten the eyes. Keep the camera near eye level, use a natural perspective, and leave enough distance to avoid exaggerated facial proportions.
For phone selfies, use the rear camera when possible, stabilize the phone, and keep the lens clean. Face a broad light source rather than standing beneath overhead light. Upload a varied set of 10 to 20 phone selfies to AiHeadshots, including straight-on, smiling, and three-quarter views, so the system has clean angles and expressions to work from.
AiHeadshots is one option for professionals who want 30+ studio-grade headshots delivered in about 30 minutes, without a studio visit. The service uses selfies as inputs, with plans ranging from Basic at $29 to Professional at $39 and Executive at $59, plus Teams pricing of $22 to $29 per seat for volume orders of 10 or more seats. See the AiHeadshots pricing options.
Fixing common headshot posing mistakes quickly
A bad pose isn't always a face problem. The camera height, crop, wardrobe, and light often create the symptom. Diagnose the cause before changing your expression.
Tense shoulders
Raised shoulders usually mean you're bracing for the shutter. Lower the shoulder nearest the camera, exhale, and roll both shoulders back and down. Take another frame before changing anything else.
A compressed chin
Pulling the head backward or forcing the chin down shortens the neck. Push the chin forward first, then lower it slightly. If the underside of the jaw still looks heavy, check that the camera isn't below eye level.
The forced smile
A wide mouth doesn't guarantee warmth. Relax the mouth, think of a real conversation, and let the eyes participate. A smaller smile with relaxed eyelids looks more credible than a fixed grin.
The hard stare
Looking directly into the center of the lens can feel intense. Aim just below it, near the bridge of the nose, while keeping the face pointed toward the camera. The eyes stay engaged without looking locked in place.
A flat frame
Square shoulders make the image feel broad and static. Rotate the torso, shift weight to the back foot, and return the face toward the lens. If the pose still feels flat, check the crop and background before adding more movement.
Test one adjustment per frame. Changing the chin, shoulders, gaze, and smile simultaneously makes it impossible to identify what worked. The best headshot pose feels controlled in the photograph and almost unremarkable in your body.
Upload 10 selfies to AiHeadshots, use the posing cues above to give the system varied angles and expressions, and see your first studio-grade headshot in about 30 minutes, starting at $29.
